Moon, Stars, and Beyond
  • Ornaments
    • Buildings
    • Cats
    • Dogs
    • Houses
    • Old World Santa
    • Other
  • Other ArtWork
  • Becoming Homemade
  • Prices/Contact Information

Make your own braided blue jean rug

5/31/2012

5 Comments


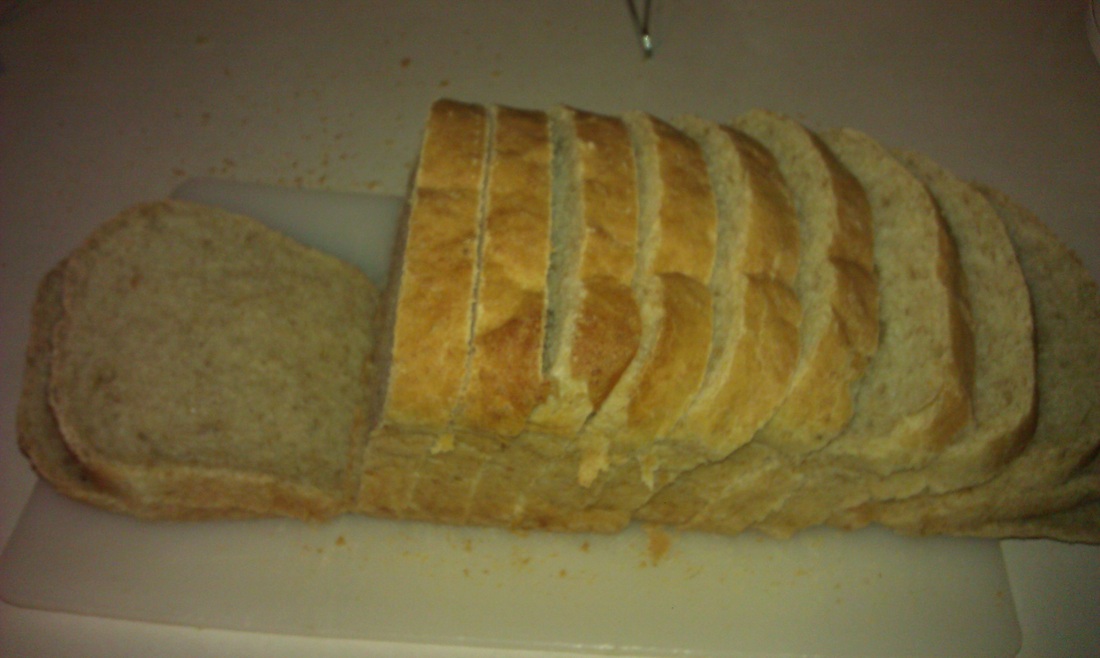
Braided rug tutorial
Made with only jeans
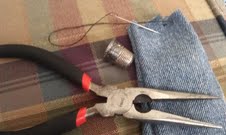
Picture
Supplies Needed
Jeans
Scissors
Thimble
Needle nose pliers
Needle
Blue thread
Quilters Thread
Picture


STEP 1

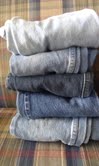
Raid your husband and kids closets for old ripped and worn blue jeans

Picture
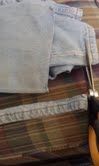
STEP 2

Cut off and throw away the hems. Fabric scissors work the best.

Picture
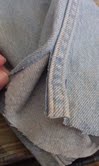
STEP 3

Cut up the sides and rip the jeans as far as you can go up.

STEP 4
Cut into 1 1/2-2 inch strips. Then rip.  No need to spend your time cutting.  Ripping made straight pieces and worked perfectly.

Picture


STEP 5

Layer 3 pieces of jean on top of each other.  Fold in the frayed ends and sew together with blue thread.

Picture
STEP 6

Begin braiding.
As you are braiding continue to tuck in and frayed ends that may show.

Picture


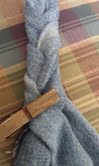
Hold together with a clothes pin.

Picture
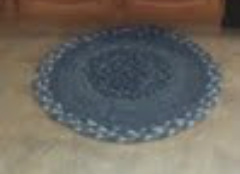
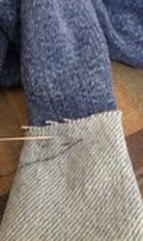
STEP 7

When you need to add another piece on to your jean piece you do not want to join all three pieces at the same time.
Cut them at different lengths if you have too.
Again tuck under frayed ends. Sew pieces together.

Picture
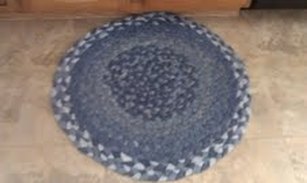
I am going drive my husband nuts with another one of my projects!  But I love this rug!  I can't wait to make my next rug.

Picture
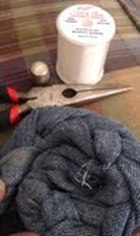
STEP 8

Start like this for a round rug.

Use quilters thread to form and sew your rug together. 


Picture
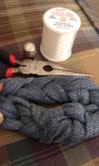
Start your rug like this for a oval rug.

* Sew your rug together on a flat surface.

Fold thread in half and thread the needle, then tie off the ends. So you will have 4 pieces of thread to hold your rug together.  Try to go in around the same hole you came out so you will see very little of the quilters thread. You want to lace the rug together like you are lacing a shoe.

When you are ready to finish your rug, tuck in the ends to the braid next to the end pieces and sew together.


5 Comments

Sweet Tea

4/4/2012

1 Comment

 
Ingredients
12 cups cold water
4 cups boiling water
6-12 tea bags * I use 6 but you may use as many as you would like.
1-1 1/2 cups sugar
2 pinches baking soda

Directions
1. Bring 4 cups of water to boil in a sauce pan.
2. Take boiling water off heat and add  tea bags, sugar, and baking soda.  Let sit covered for 15 minutes.  No longer this is what makes your tea bitter tasting.
3. Take tea bags out of sauce pan and pour your tea mixture into gallon size pitcher.
4. Add remaining water to pitcher. 
5. Let chill in refrigerator but if you can't wait pour over some ice and enjoy!


Picture
1 Comment

Oh my! OREO's

3/3/2012

0 Comments

 
Homemade Oreo Cookies
Takes about an hour to make from start to finish.
Worth every second!  

This last time I made these I doubled the recipe for the chocolate wafers and tripled the cream filling and made double stuffed Oreos.  
Chocolate Wafers  

Ingredients
 1 1/4 cup all-purpose flour
 1/2 cup of unsweetened cocoa
 1 teaspoon baking soda
1/4 teaspoon baking powder
1/4 teaspoon salt
1 cup sugar
1/2 cup + 2 Tablespoons Butter (1 1/4 sticks) ROOM TEMP
1 large egg  
  1. Preheat oven to 375 degrees
  2. In mixer thoroughly mix flour, cocoa, baking soda, baking powder, salt and sugar.
  3. Low speed add butter then the egg
  4. Continue mixing until ingredients become a dough.
  5. Roll the dough into large marbles size balls and then flatten with spatula or hand.
  6. Place on cookie sheet 2 inches apart
  7. Bake on the center rack for 8 minutes
  8. Once done baking let cool for a few minutes before moving to cooling racks.

Filling
 
1/4 cup room temp butter (1/2 stick)
1/4 cup vegetable shortening
2 cups sifted powder sugar
2 teaspoons vanilla
  1. In mixer place butter and shortening and mix at low speed
  2. Gradually beat in the powder sugar and vanilla.
  3. Turn mixer on high and beat 2-3 minutes until filling is light and fluffy
 Assemble the cookies,
in a pastry bag or gallon bag snip off corner,
squeeze cream in the middle of the chocolate wafer. 
Place another cookie equal to size on top and press lightly.  

Get a big glass of cold milk and enjoy your homemade Oreo!
Picture
0 Comments

Laundry Detergent and Fabric Softener MADE AT HOME

2/29/2012

1 Comment

 
After starting my journey of becoming homemade I never thought I would be making my own Laundry Detergent.   I have many friends who have made their own detergent for much longer.  This has been my first time ever attempting this recipe.  After reading many reviews and talking to LOTS of people about their recipes. I finally decided "WHAT THE HECK!" 

LAUNDRY DETERGENT

INGREDIENTS
1 Bar of Fels Naphtha/ Ivory
2 Cups Borax
2 Cups Super washing soda
* I found all of these items in the laundry detergent section of the grocery store.

DIRECTIONS
Grate soap.  I used my food processor.  Then mix remaining ingredients. 
1-2 Tablespoons per load.  Works with HE washers too!!!
BIG TIME SAVINGS!

FABRIC SOFTENER

INGREDIENTS
6 Cups of hot water
3 Cups white vinegar
2 Cups favorite scent of cheap conditioner.

DIRECTIONS
Mix conditioner with hot water until conditioner is dissolved.
Add vinegar and mix well.
2 Tablespoons per load.

Well now at least you won't be miserable because of the cost of laundry anymore. 
Happy Laundry Day!


1 Comment

POT OF GOLD

2/27/2012

4 Comments


Cheese dumplings and tomato Soup. 
This is a super easy recipe and you most likely have all of the ingredients.  My kids love this soup, anything my kids love is a bonus. I remember my mom making this when we were growing up and we would fight for the dumplings.

INGREDIENTS 
Tomato Soup
Water
Milk *optional
Bisquick
Salt
Pepper
Cheese * any kind you have or prefer

Mix tomato soup the way you always do.  I always half the water with milk.  This is optional but it makes the soup creamier.
While soup is getting hot I make my dumplings.  If you put milk in the soup you need to have an extra hand to stir so the milk doesn't burn.
For the dumplings you want to mix Bisquick and water together. I dump Bisquick in a bowl and then add a little bit of water until the Bisquick becomes a dough.  Season dough with salt and pepper to your liking.
Wrap the dough around a piece of cheese- I use what ever I have.  You do not want the dumpling to be to big because they will about double when cooked. 
The soup needs to be very hot almost boiling before dropping the dumplings in the soup.  *Be careful the soup will splash back at you.  When the dumplings float to the top your POT OF GOLD is ready to devour.
Picture
4 Comments

Hard to find, but worth the hunt.

2/17/2012

0 Comments

 
This little gadget for my kitchen is one of my favorite tools.   Maybe it is the memory of my Dad sitting at the kitchen table and eating more of the cheese than what was being shredded.  I hope one day my children will have the same fond memory.
Picture
Mom and I love to go on antique hunts and this one was life or death.  I told her if I couldn't find one, I would just kill her to inherit hers! 
After YEARS of searching we not only found one but two and of course my younger brother just had to have the other one.
This cool antique is call a Mouli Shredder.  It comes apart to change the disk for different cut styles.  It is also safe for children to use with an adult of course.
My next hunt is already in place for a vintage egg scale.
What are your favorite kitchen gadgets?

0 Comments

Chocolate covered strawberries

2/13/2012

0 Comments

 
Just in time for Valentines day! 
Make them for yourself or for someone you love but DON'T break your budget.
I bought 2 pints of strawberries for $5.00 and the chocolate wafers for $5.00. 
Alright, Alright, they are not Neuchatel Chocolates and of course will never ever compare
but they are CHOCOLATE COVERED STRAWBERRIES.  I mean just where can you go wrong?!?!?!

INGREDIENTS
About 2 Cups of Chocolate wafers
1-2 pints of strawberries

SUPPLIES
Double boiler
Toothpicks
Cookie sheet
*candy mold

DIRECTIONS
I put the chocolate wafers in the double boiler (Sauce pan with metal boil on top) on the burner at med- med high heat. 
As this was heating I stuck the toothpicks in the top of the strawberries. 
When the chocolate completely melted I started to dip the strawberries and then place the coated strawberries on a cookie sheet. 
Once all of your strawberries are coated, place the cookie sheet in the freezer for 5 minutes.   Whaaaalaaa
** If you want the white chocolate you need to purchase the white chocolate wafers. While the strawberries are in the freezer start the white chocolate the same way as you did with the milk chocolate.  Then just use a spatula to let the white chocolate dip on the already dipped strawberries. 
* With the left over chocolate I used the candy mold that I use for the gummy candies.

Happy Valentine's day
from Moon, Stars,and Beyond
Picture
0 Comments

How many grill covers have you bought?

2/9/2012

0 Comments

 
We were buying a grill cover every 6 months or more.  They would either blow away or they would shred.  After trying every single grill cover out there ( ok!  Not every but it felt like it)  I have found the one.  It did after 2 years rip but I have to say the reason why I am swearing by this company is because of what they did to keep me.   I contacted them last week because of the rip and I thought there might be a warranty on the grill cover.  I paid less than $35.00 plus free shipping from Amazon, 2 years ago. So I didn't expect much.  This was last week that I contacted them.  I filled out the online form and sent the required information.  Today (less than a week later) I received a brand new grill cover.  NO QUESTIONS ASKED!  Now that is what I call service. 
Classic Accessories, Thank you!
Picture
0 Comments

Ready for Bread?

1/26/2012

0 Comments

 
Picture
 I made this recipe for my family months ago and have made it ever since.  My son loves it so much he refuses to eat the stuff you buy!  He is not the only one in my home that feels that way.   I promise it sounds like more work than what it really is and you will enjoy the out come just as much as everyone else. 

http://allrecipes.com/Recipe/fabulous-homemade-bread/detail.aspx

I have followed this recipe many times and the bread always comes out amazing.  The first time I made this though I came to a point in the recipe where no more would fit in my Kitchen Aid mixer. I dumped the remaining dough which is very moist and I kneaded the rest of the flour into the dough.  You do not have to do this if you half the recipe but I always love having the extra loaves to give to family and friends.

* For perfect slices use a electric knife

Original Recipe Yield 6 loaves 
Ingredients
  • 1/2 cup warm water
  • 3 (.25 ounce) packages active dry yeast
  • 1/4 cup bread flour
  • 1 tablespoon white sugar
  • 2 cups quick cooking oats
  • 2 cups whole wheat flour
  • 4 1/2 cups warm water
  • 1 1/2 tablespoons salt
  • 2/3 cup brown sugar
  • 2/3 cup vegetable oil
  • 10 cups bread flour
Directions
  1. In the mixing bowl of an electric mixer, stir together 1/2 cup warm water, 1 tablespoon sugar, 1/4 cup bread flour, and yeast. Let grow for about 5 minutes. It will bubble almost immediately.
  2. Measure oats, 4 1/2 cups warm water, whole wheat flour, salt, 2/3 cup sugar, and 2/3 cup oil into the mixing bowl. Mix on low speed with a dough hook for 1 to 2 minutes. Increase speed slightly, and begin adding bread flour 1/2 to 1 cup at a time until dough pulls away from sides of bowl. Humidity determines how much flour you need before the bread pulls away from the edge of the bowl. It is normal for the dough to be sticky.
  3. Place dough in an oiled bowl, and turn to coat the surface. Cover with a damp cloth. Let rise in a warm spot for 1 hour, or until doubled in size.
  4. Divide dough into 6 pieces. Shape loaves, and place in greased 8 x 4 inch pans. Let rise until dough is 1 inch above rim of pans, usually 1 hour.
  5. Bake at 350 degrees F ( 175 degrees C) for 35 minutes, or until tops are browned. Let cool in pans for 10 minutes, and then turn out onto wire racks to cool completely.
0 Comments

Homemade Cereal! Stuff your kids will really eat and love.

1/24/2012

1 Comment

 
After lots of research I have become beyond frustrated with the contents in our most popular food in our home, cereal.  Did you know I could not find a single legitimate recipe for cereal.  When I say cereal I mean the stuff you buy at the store in the shape of circles, rice, and flakes. When I become determined, watch out!

Here are the sites that I feel educated me the most in creating an amazing cereal;
http://www.realfoodfreaks.com/2011/09/14/is-cereal-good-for-you/
The recipe I adjusted from this site
http://www.thehealthyhomeeconomist.com/homemade-cold-breakfast-cereal-grain-free/
The reason I changed this recipe is because I did became intimidated by the almond and coconut flours.  So by all means if this is not intimidating to try the original recipe. 

Peanut Butter Cookie cereal

Ingredients

5 cups- All purpose flour
4 cups- milk-  Really you are just making a dough.
2 3/4 cups- peanut butter
1 cup- honey
1 teaspoon- salt
2 teaspoons- baking soda
2 teaspoons- Vanilla


Directions

Place flour and milk in a large bowl mix together and let sit out on counter overnight. Cover with a towel.
After allowing dough to rest overnight mix remain ingredients in bowl with the dough. 
Divide the dough into 2- 9x11 dishes.  You are making a type of cake.
Bake at 350 degrees for 30 minutes
After cake cools crumble cake onto cookie sheet into cereal size pieces. 
Place back in the oven at 200 degrees until drys completely. 
This recipe made 2 gallon size bags of cereal.

Now you can have cereal and really know what you are eating.
I think it taste like you are dipping a peanut butter cookie in milk but you still get the crunch of cereal.


Picture
1 Comment
<<Previous

    About me

    My Name is Cari.  I have been happily married to my husband, Brian for 11 wonderful years.  We have 2 beautiful boys, Adam and Matthew. 
    I work in a Memory support unit and try to bring happiness to the people that welcome me into their lives.
    Running, hiking, biking, walking are all things I like to do in my free time. 
    After losing my dad in 2011, I have learned that life is short and I am going to love every second that I have here on Earth! 

    Archived

    May 2012
    April 2012
    March 2012
    February 2012
    January 2012

    Categories

    All
    Products
    Recipes
    Tutorial

    RSS Feed

Powered by Create your own unique website with customizable templates.